The new owner of this guitar fell in love with someone else’s classic J-45 and loved the enveloping bass tones and the dry midrange that this style of guitar can do so well. Since it’s wrong to covet guitars belonging to touring musicians, we decided to build him his very own classic slope-shouldered dread to get the sound, look and feel he was dreaming of. We went pretty traditional, using a Honduran mahogany set (from Hibdon Hardwood in St Louis) with rosewood accents. We supercharged the guitar by building around a red spruce–often called Adirondack spruce–top from Old Standard Wood that is perfectly quartered with minimal runout and provides kilowatts of acoustic power to spare.
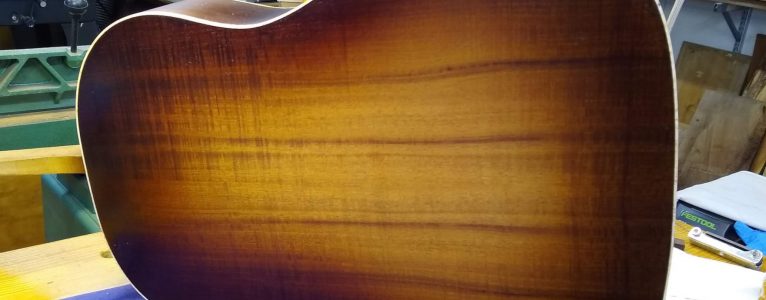
Yep, I dropped this one in the shop after applying the last coat of finish (the first time around), so got to take another run at the body finish, and practice made perfect. It seems I’ve been only building sunbursted/toned guitars lately, but I enjoy the process of transparently coloring a guitar to bring out everything the wood has to offer. Most of the color is applied using waterbased dyes and rags, to recreate the looks of the best toned instruments I’ve seen. The finish is waterborne lacquer. All of the purflings, bindings and rosette are crafted from real wood, and Taylor Mullins (Holter Pickguards) made a custom celluloid pickguard that looks perfect. This guitar is amplified via a K&K Pure Mini.
It sounds great! It has the big, confident bass we aimed for, the quick decay we wanted, and the mids and high notes travel with more conviction than most guitars this size (that’s the red spruce top kicking in). It strums like a beast with great percussion and tone, can boom-chuck with the best guitars, and is quite nice for fingerstyle. Maybe the best guitars are dropped on their heads during the building process. 😉
This big slope-shouldered beauty was born to sing. She was a deep and crisp voice that will only get better with time.
Using dye in a sunburst shows off the amazing depth and figure of a beautiful red spruce top.
The burst glows through the semi-transparent celluloid pickguard provided by Taylor from Holter Pickguards.
I source beautiful mahogany sets from Hibdon Hardwood in St. Louis.
Honduran mahogany glows when finished well–and I’ve found that sealing with shellac enhances the visual depth more than any other material I’ve tried.
A fine Honduran mahogany back set off by curly maple bindings.
This neck had a nice bit of figure to it, so I used dye to enhance it.
I found a nice dark rosewood fingerboard for this one.
Gotoh makes smooth and precise tuners; plus they look great.
The heart and engine of this guitar is a lovely red spruce soundboard from Old Standard Wood.
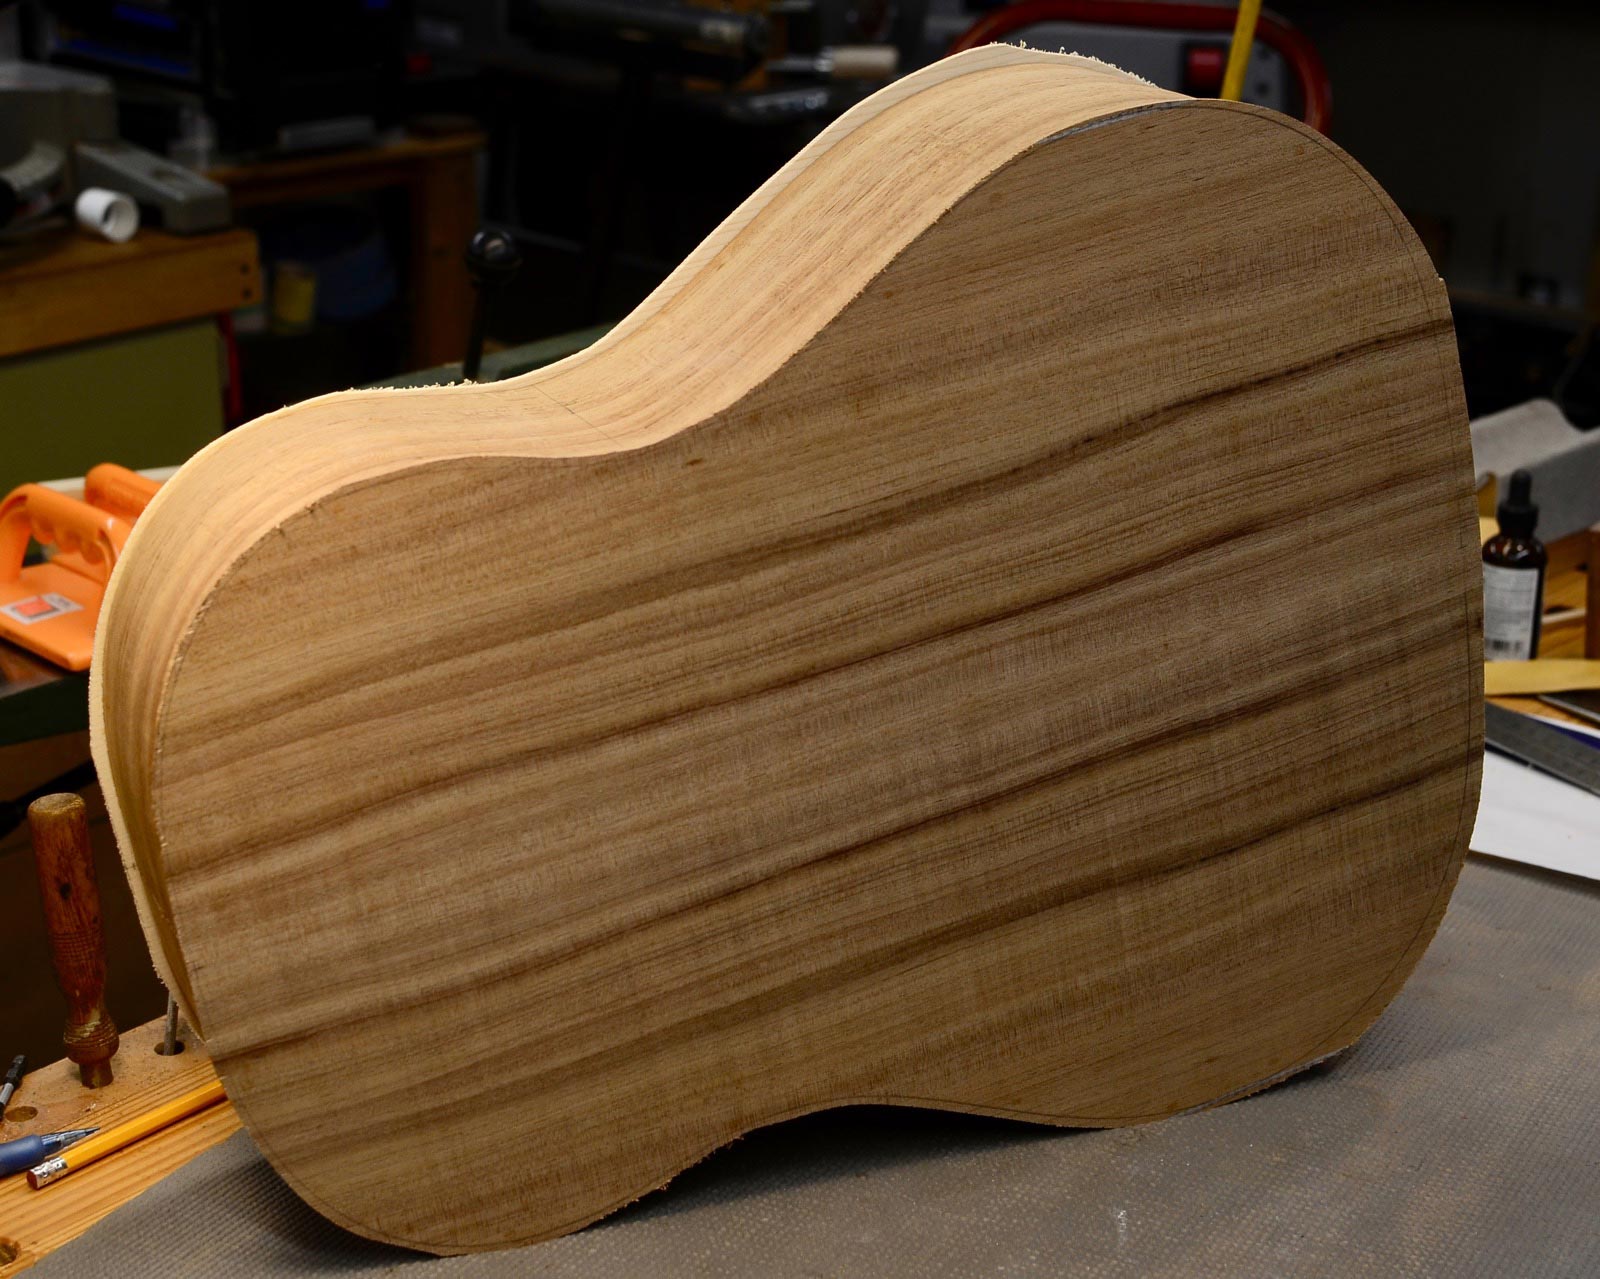
The commissioner of No 28 got in touch with me after seeing number 27, the first slope-shouldered dread I built. He was sure that was interested in a J45-like guitar, but it needed to work well for strumming and fingerstyle playing. I knew that the Adirondack spruce tops I buy from Old Standard Wood would produce a crisp, articulate sound great for fingerstyle, and we decided on Tasmanian blackwood for the body wood. Sourced halfway around the globe from Australian Tonewoods, this acacia species is a relative of Koa, and has a mass similar to Honduran mahogany but a harder surface. The result is a sound that has many of the desirable qualities of a mahogany guitar (dry, woody tone and a relatively quick decay) with increased definition and crispness. The acacia worked beautifully with my water-based dye sunburst technique, and looks very deep and shimmery under the sunburst and waterborne lacquer finish.
The top is an absolute powerhouse. When I first played it, I was instantly aware of how “awake” the neck is, with plenty of tactile feedback for the player. It has the powerful, beefy bass desired in this size of guitar, but the mid-range and higher treble notes have dimension and interest far exceeding what I would expect from a guitar this large. All of the purflings, bindings and rosette are crafted from real wood, and Taylor Mullins (Holter Pickguards) made a custom celluloid pickguard that looks perfect. I’ve used an adjustable neck joint inspired by Mike Doolin, though I keep tinkering with the joint design. This guitar is electrified via a K&K Pure Mini.
Overall, number 28 is a beaut, and a thrill to play; I hope it provides many decades of thumping excitement and rich sound.
This is my take on the classic J45 guitar, but with transparent coloring.
The heart and engine of this guitar is a lovely red spruce soundboard from Old Standard Wood.
The Honduran mahogany neck pairs well with the acacia body.
Tasmanian blackwood is a close relative of Koa, and it’s quite evident in the way the wood takes dye and glows under finish.
The commissioner requested a custom headstock inlay made up of many small pieces of gorgeous pearl.
We used Gotoh SXN-510V tuners with ivoroid buttons on this guitar, which marry modern threaded bushings with classic open-backed gear assemblies for smooth operation and good looks.
The Tasmanian blackwood shimmers under the dye and finish, especially on the curved sides.
Here is a sound sample played using a Clayton “Raven” pick.
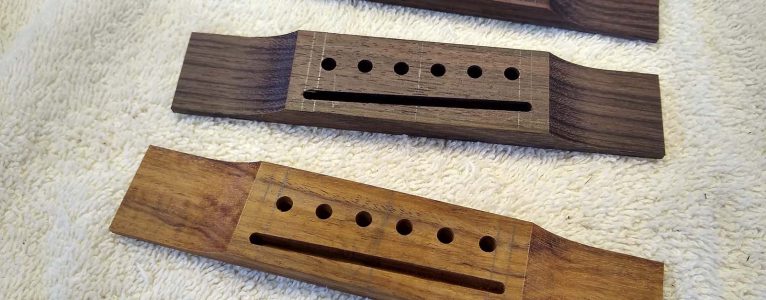
I know I’m nearing completion when it’s time to make guitar bridges. Number 28 (Tasmanian blackwood sides & back) is close now. I am sanding out its finish, which means that the bridge will probably go on in the next week or so. I roughed out four bridges for upcoming guitars: African blackwood (a nearly black rosewood), granadillo (the golden brown bridge pictured below), and two East Indian rosewood (the brown purple blanks which will be used on the slope-shouldered dread siblings.)
Once the blanks are square and trimmed to dimension, I read the grain to choose the saddle and pin hole locations.
I cut the pin holes and slot the saddle using a jig that mounts to the drill press table.
Once the holes and slot are cut, then it’s time to cut the blanks to the final length.
For these bridges, they get a simple scoop wing, which I shape using a small drum sander.
I’ve put just about as much finish as I want to on these bodies. Meanwhile, I’ve pushed the neck blank toward being a neck, complete with frets, color and finish. I still need to apply some final finish top coats to both the body and the neck, then, while the finish has a chance to cure up, I’ll make the bridge, saddle, and nut. Because of the adjustable neck joint I use, once everything is cured, the guitar will go together pretty quickly. So far I’m happy with the looks, feel and sound of everything, so stringing this one up will be fun!
To make the neck profile, I start by gouging and rasping the neck to the curve I want near the first and tenth frets (or so).
I check the profile using templates cut from mat board.
Once the curves are close at those two points, then it’s time to connect them using a spokeshave.
After the spokeshave, I switch to a card scraper, rasps and files to finish the profile.
After marking the peghead shape, I cut the waste away with a saw then use a file to get close to the final shape.
Once I’m happy with the neck side profile, I prep the fingerboard surface, leaving some relief for string vibration.
Getting closer to the final peghead shape.
I use a homemade guide to accurately drill the tuner post locations.
Once the final sanding is completed, I use water-based dye to raise the grain.
More sanding! So much sanding!
Mahogany necks have plenty of pores that need to be filled, so here I’ve smeared Timber Mate pore filler over the entire neck.
Yep, you have to sand the pore filler back to wood.
The headstock face is pore filled, also.
Sanding back to wood on the headstock face. Almost there!
The pores are filled, and now it’s ready to take color.
I’ve applied the color, sealer shellac and the bodying coats.
The next task is to flat-sand the neck so I can apply final top coats of finish.
The sunburst color is sealed in place with shellac, and I can remove the resist and start cleaning up the bindings.
Scraping the liquid frisket from the rosette.
The carefully scraped top looks pretty crisp!
Removing the masking tape from the back and finding more cleanup work to do.
The bindings are scraped back to their natural maple color.
Now I can round the bindings over so that the body has eased corners.
Step back and admire the cleaned edges on two sunburst bodies.
Once the guitar is sealed with shellac, I add body coats of a water-borne acrylic lacquer for toughness.
Here I’m sanding the water-borne lacquer coats flat before applying the very thin final coats.
It’s time to get the bodies finished so I can allow the finish to cure while I finish the necks. Once the bodies are sanded, the pores in the the wood need to filled, then it’s time to get out the wood dye. This acacia body is getting a classic burst (which will look amazing over the curly wood).
Final sanding of the body. You have to find and fix any problems at this point.
When final-sanded, this acacia almost has a waxy finish to the surface already
Applying the shellac seal coat gives you the first look at how awesome the wood really is!
Once the body is sanded, it’s sealed with shellac before the pore filler is applied.
I made a sample board of the dye colorants I expected to use in this burst.
The figure pops under the first body color, which is used to raise the grain as well as form the center of the burst.
The direct-to-wood dye has been applied, and another shellac seal coat is applied. Wow!
These J45 twins are coming right along, and I’ve installed the sugar maple bindings and done quite a lot of the neck and fretboard work. Once the box was closed, I switched over to doing the major carpentry work on the neck, which is somewhat complicated by using my version of the Mike Doolin adjustable neck joint. For these guitars, I’ve made a small change to my method again so that the fingerboard is supported by a single, contiguous length of mahogany to further improve the playability of the neck.
Cutting the binding channel for the sugar maple binding
I’ve glued one side of the binding and am preparing to install the other side’s purfling and binding.
The pre-bent binding is first pulled into place with tape around the perimeter.
I follow the tape with an old car tire innertube cut into strips that acts like a big strong rubber band.
The new purfling is scraped flush to the top
Once the headstock scarf joint is made and the nut location is set, I rout the truss rod slot.
Using a floating tenon, I can orient the grain of the tenon for strength.
Once the fretboard surface is ready, I add the heel block and floating tenon.
I cut a recess in the top of the guitar to allow the neck to fit.
Checking the fit of the neck in the routed body.
Checking the fit of the neck with the fretboard in the routed body.
I use the shaped heel to score the sides for the neck heel recess.
The body with the fingerboard extension and neck heel recesses routed out.
The slope-shouldered siblings are moving along quite speedily, with the box on this Tasmanian blackwood guitar being closed over the last week. The Acacia melanoxylon sides and back have been a joy to work with: it bends easily, sands well, and has a nice, smooth finished surface. The box has a tremendous tap already, and the top frequency came in right at 148Hz before gluing the back on. I’ve moved onto the necks and will return to this body to install bindings once the no 30 box is closed.
I often use solid laminated linings that are pre-bent and laminated, then installed in the ribs.
The solid mahogany linings make the rim assembly very stiff and also very stable. The Acacia looks great with a light sanding.
Using an X-brace on the back plate makes it easier to tune the plate to a supportive frequency.
The back braces are carved and the back is ready to install.
With red spruce bracing this stiff, the bracing has to be pretty minimal to allow the top the flexibility it needs.
The completed rim assembly is sanded using radius dishes so that the arched plates meet the sides to form a solid joint.
I’ve glued the top in place and checked the top frequency. The ribs are ready to accept the back.
The solid linings stiffen the ribs so that more of the soundboard can be used to make sound.
The body has been freed from the mold after both plates are glued in place.
The Tasmanian blackwood looks and sounds great so far.
I’m building two J45s this time around, and this is the second. The commissioner is looking for a pretty classic J45 sound–friendly, unpretentious and loose. I have had a really nice set of mahogany on hand for a decade or longer that was looking for the right project. This is the one. It’ll be paired with the slightly more flexible of the two Adirondack spruce tops to make a fantastic slope-shouldered dread.
This red spruce top is joined and ready to party.
Another terrific Adirondack spruce top from Old Standard Wood.
I glue top and back plates together in a simple jig that keeps the plate flat and applies closing pressure via wedges.
I’ve had this really nice set of mahogany for the back and sides for quite a few years.
The true Honduran mahogany, Swietenia macrophylla.
I cut a fresh batch of spruce bracewood for these guitars and felt like a millionaire, working with all this fine material.
Three good options for fingerboards, left to right: The leftmost piece is actually the mahogany neck blank, then granadillo (a hard, stripey wood), East Indian rosewood and finally katalox (a super hard purple-black wood)
Katalox is the hardest of the three (far right), granadillo is the second hardest, but East Indian rosewood, though not as dense as the other two, is a very popular material for fingerboards.
Bending up the thin wood strips for use in the rosette.
It’s fun to fit the rosette strips to the rosette pocket so that everything fits tightly for a clean result.
The rosette features curly maple which will be used for the purfling on this guitar, too.
I use a go-bar deck to glue in plate braces, so that the plate can be domed for strength.
Rough-shaping the back braces with a handplane.
The red spruce top and back braces are in place and have been roughly shaped.